Many owners of modern gadgets are trying their best to expand the memory in their device. Unfortunately, 4-8 GB of internal memory is not enough for users to work comfortably. An SD card allows you to expand these boundaries. You can transfer music, videos or text documents to it. But what can you do with games? How to move applications to a memory card? Now there are many ways to help you do this.
Standard means
As we have already found out, built-in memory plays an important role in using the device. As a rule, about 1 gigabyte is allocated for the operating system, 2 GB for multimedia files. So what remains? Only 1 gigabyte is allocated for various applications. Of course, by modern standards this is very little. Nowadays there are Android applications that take up more than 2 GB. It doesn’t matter how powerful your mobile phone is, because without memory you won’t be able to install normal applications. It is because of this that many users are looking for a way out of this situation. Let's look at how, using standard tools, you can move applications to a memory card from Samsung, Asus and other well-known brands. Unfortunately, this method will not work for owners of Chinese phones.

The fact is that in Chinese models, developers separate internal memory for general use and memory for multimedia. When transferring, the files will simply move to the second half.
On more expensive models, the developers have provided the ability to transfer applications to an external drive. This method does not require any third-party utilities. If your phone supports this feature, then you can easily move the necessary programs. How to move applications to an Android memory card?
First, let's go to the settings of your device.
Go to the “Applications” item.
In the list, find the application that needs to be moved and click on it.
In the new window, click on the “Move to USB drive” button.

Unfortunately, not all programs can be moved. If the developers have provided such an opportunity, then you will move the application in a few minutes. You also need to remember that not all files are moved to the SD card. Only large files are transferred, while others that are responsible for launching the application remain on the internal memory.
Additional software
How to move an application to a Lenovo memory card? This can be done automatically using additional programs. The most common is App Mgr III. This utility is available to everyone. It's free and you can download it from Google Play. The program is quite simple, anyone can understand the functionality. When installing a new program, it will warn you that you can install the game on the SD card. Agree with it and wait for the game to install.
Using the App Mgr III program
How can I move applications to a memory card using additional software? If the game or program is already installed on the device, then you should follow the instructions to transfer the utility.

1. Open the required application and select “Moveable” from the top. This will show you all the games that can be moved to the SD card. You can also view games and programs that have already been moved by selecting “On SD card”, and utilities that cannot be transferred.
3. Confirm the selected actions and wait for the set goal to be achieved.
Using FolderMount
FolderMount is a special program that performs its functions perfectly. It will help you move the application. Using this program, the Android memory card will be used as the main memory, since it allows you to move almost all files to an external drive. Unfortunately, FolderMount has a significant drawback: it requires ROOT rights. If you get superuser rights, then this utility will help you a lot. It transfers not only game files, but also their cache. It's great for gaming. You can also transfer applications not only to an SD card, but also to any other external storage device.

FolderMount operation
Transferring files using this utility is quite simple, but some users may encounter certain problems. How to move applications to a memory card?
Download the program from Google Play and install it.
Click on the button in the form of a plus sign, which is located in the upper right corner.
In the new window, first select “Name” and write the name of the game you want to move.
After this, select “Destination” where you want to move the game.
Confirm the action by clicking on the checkmark in the upper right corner. We wait for the application to move to the memory card. Then you can move on to other games.
Conclusion
How to move applications to a memory card? As you may have noticed, there is nothing complicated about this. If using standard tools you were unable to move the game or program, then you should install additional software. Of course, these programs will not be able to transfer all applications to the SD card, but this way you will still free up memory. The most effective utility is FolderMount, but it requires ROOT rights. When you get superuser rights, you take a risk, but it greatly expands the functionality of the phone as a whole and gives you many new features.
Modern Android devices support expanding the internal memory with cards of a very decent size. This is useful for many reasons. For example, in the event of a factory reset or other failure, you will not lose important applications and personal information. Among other things, on weak smartphones and tablets, this allows you to slightly speed up the device, leaving it with additional space to create a swap file.
Built-in way to transfer an application to an SD card in Android
For many applications, there is a native method of transferring to a card. To determine whether you can move the program to another drive, go to “Settings” -> “Applications” and see if the button labeled “Move to SD” is active. If yes, feel free to click and wait for the system to handle the task on its own. If the button is not active, the developers may have blocked this function (working from the built-in disk is faster by default). In this case, go to section 2 and use third-party software.
Programs for transferring to SD card in Android
There are a huge variety of paid and free programs that can help us with the assigned task. However, the most popular of them is AppMgr III, also known as App 2 SD. In addition to its main function (transferring programs to the card), it also clears the cache and shows summary information on files, their distribution into groups, free space on the device, and so on. Managing the program is extremely simple: all the contents of the phone/tablet are divided into 3 sections – “On the phone”, “On the map”, “Only on the phone”. Consequently, the “On the map” applications can be moved to the “On the phone” section, and the third group, alas, cannot be transferred at all. It’s very convenient that App 2 SD supports the ability to bulk select and transfer, so you don’t have to waste extra time dragging programs one by one.
Transfer cache to SD card in Android
An interesting detail regarding the optimization of Android devices is that the cache can take up more space than the application files themselves. Therefore, a separate transfer of the cache to an SD card may be useful. For this purpose, you will need another program called FolderMount, as well as being previously rooted. If your device meets these requirements, use the program as follows:
- launch FolderMount and click “+” in the upper right corner of the screen;
- in the “Name” line, enter the name of the application whose cache we want to move;
- in the “Source” line, respectively, write the address of the folder with the cache, for example *SD/Android/obb/program folder*;
- in the “Destination” line, select the final location;
- Click the checkbox at the top and the pin icon opposite the name from the first item in the list;
- When the transfer is complete, the “pin” will turn green.

If you are planning to transfer programs to an external card because the device has become slow, do not rush to complicate yourself with this process. It may be worth using special programs to clean up disk space, after which the device will regain its full functionality.
Almost all phones and tablets released in 2018-2019 have a large amount of built-in memory, which is expandable using a microSD card of 32 GB or more (in mid-class models and flagships). But among owners of old and inexpensive devices with internal storage of 4 GB or less, the issue of lack of free space on a smartphone is especially acute. In this article, we will look in detail at all the ways to transfer applications to an SD memory card in Android.
The instructions are intended for both beginners and experienced users, so it talks about transferring applications not only using standard means, but also using special programs that require root rights.
You can also free up space in the internal memory by deleting system applications.
How to transfer applications to a memory card using accessible means
Since the earliest versions of Android, the system has had the ability to transfer most installed applications to an SD card. Instead, in Android 6.0 Marshmallow, it became possible to use a memory card as an internal drive (this method is also described in the article).
Let's look at the function using the example of a Samsung phone running Android 5.0:
Go to Settings and select Apps. Depending on the manufacturer and firmware, the item may be called “Application Manager”, “All Applications”.

Select the downloaded game or program. If the application can be moved, the “Move to SD card” button will be active. Click on it.

If the button does not work, the developer has prohibited installation of the application on the memory card and it will not be possible to move it using standard means.
AppMgr III (App 2 SD) for transferring applications
In order not to open the settings of each game or program and not see whether they can be transferred or not, use the AppMgr III (App 2 SD) utility - in it, the moved applications are collected in a separate tab.

Hold your finger on app cards to mark them. Select the ones you need and click on the folder icon at the top. In the new window, click on the red arrow, which will take you to the application details page. To go to the settings of the next selected program or game, press the Back button.

AppMgr III will also tell you which applications should not be installed in external memory so that all their functions work correctly.
Using an SD card as internal memory
This feature was introduced in Android 6.0 and works in Android 7 Nougat, Android 8 Oreo and Android 9 Pie. It allows you to use a memory card as a built-in storage device. Since SD replaces internal storage, it makes sense for the flash card to be larger than the internal memory. And for applications to work quickly, the SD card must have a high write speed.
Data from a memory card formatted as an internal drive will not be read if you install the SD card in another smartphone or tablet. To use the card in a new device, you will have to format it as portable storage.
After connecting, a message will appear in the notification shade that a new memory card has been detected. Just click “Configure”, select “Internal memory” in the window that opens and follow further instructions. Don't forget to transfer files from the SD card to another storage device, as they will be deleted during the formatting process.

Detailed instructions for setting up the card:
1. Go to “Settings” → “Storage” (may be called “Storage and USB drives” or “Memory”).

2. Click on "SD Card".

3. In the upper right corner, open the menu, select “Settings” (in some firmware “Memory”).

4. Click Internal Storage.

5. A warning will appear on the screen that all data saved on the SD card will be deleted during the formatting process. Therefore, copy them first, and then click “Clean and Format”.

6. If your smartphone uses low-class SD (for example, microSD Class 6), a message will appear on the screen that the memory card is slow.

7. Before completing the formatting process, you will be prompted to transfer some files and applications to the SD card. Select the option you want, click Next and then Transfer.

8. Finally, click “Done” and manually restart your phone.

Now open “Settings” → “Applications” → “Application details” (if this item is not there, proceed to the next step) and select the installed program or game.

Click “Storage” (may be called “Memory”), then click the “Change” button and select the SD card.

In the window that appears, click “Move” and wait for the transfer to complete.

Formatting a memory card as an internal drive using ADB
If your smartphone has Android 6, 7, 8 or 9 installed, and there is no option to format the SD card as internal storage in the settings menu, the manufacturer has not added such an option to the firmware. But users can format the memory card themselves using the utility.
To do this, activate on Android, connect your mobile device to your PC and run ADB from the command line or from Windows PowerShell if one of the latest builds of Windows 10 is installed on your computer. Enter the following command and press Enter (in Windows PowerShell, add ./ before the command).

The console will launch and the “$” sign will appear in it. Type the command and click Enter:

The line below will display the view's SD card ID disk:NNN,NN. Replace NNN,NN to the value of the received identifier and run the command:

Wait for the command to complete. Then go to Settings → Storage and select SD card. Expand the list of options by clicking on the three dots at the top and click “Transfer Data.”

Select "Transfer" and wait for the process to complete. Finally, click “Done.”

How to move multiple apps to SD card in Android 8 Oreo and 9 Pie
To avoid performing the same steps to transfer applications separately, use the AppMgr III (App 2 SD) program, which was described at the beginning of the article. Only on Android 8 Oreo and Android 9 Pie you will have to give AppMgr III a couple of permissions.
Launch the application. A notification will appear that the program needs access to your usage history. Click Allow, select AppMgr III from the list of applications, activate the switch and return to the program. You can also configure access to your usage history by going to “Settings” → “Applications and notifications” → “Advanced settings” → “Special access” → “Access to usage history”.

Select the games and programs that you want to move to the flash card and click on the image of the folder with the arrow inside. In the "Move to Map" window, click on the red button below.

A message will pop up saying that AppMgr III needs permission to change system settings. Click on the switch and you will be taken to settings. Activate the toggle switch and return to the application. The options for this permission are located under Settings → Apps & notifications → Advanced settings → Special access → Change system settings.
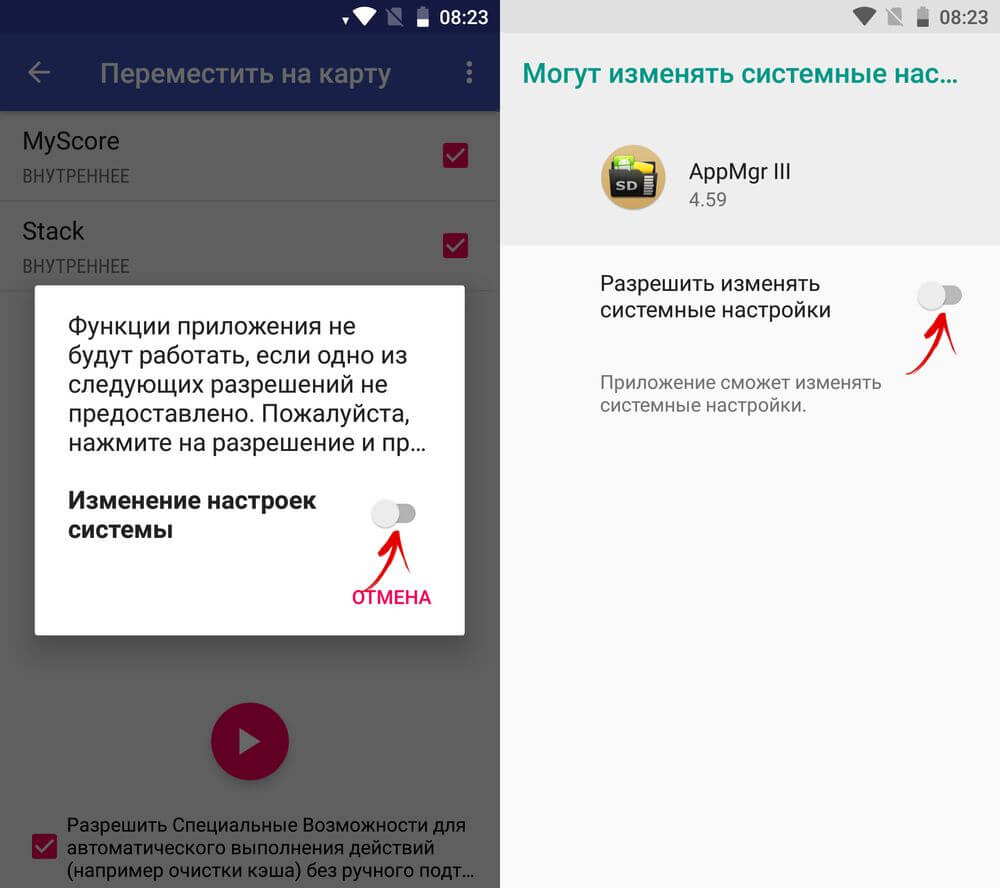
You will then be prompted to allow AppMgr III to automatically perform actions without manual confirmation for each application. Click "YES", go to the "Accessibility" section, select "AppMgr III", switch the toggle switch to the "ON" position and confirm by clicking "OK". Then return to the program.


Application transfer will begin immediately. Just wait for it to complete.

At the end it will show that the applications have been moved to the memory card.
Transfer games to SD card in Android
Most of the user memory is occupied by the cache of installed games. To move it, we will use the FolderMount program, which can mount directories from internal memory to external memory. It requires .
Download FolderMount from Google Play, launch it and provide Superuser rights.

In the “List of Pairs” tab at the top, click on “+”.

Come up with and enter the name of the folder pair in the first line.

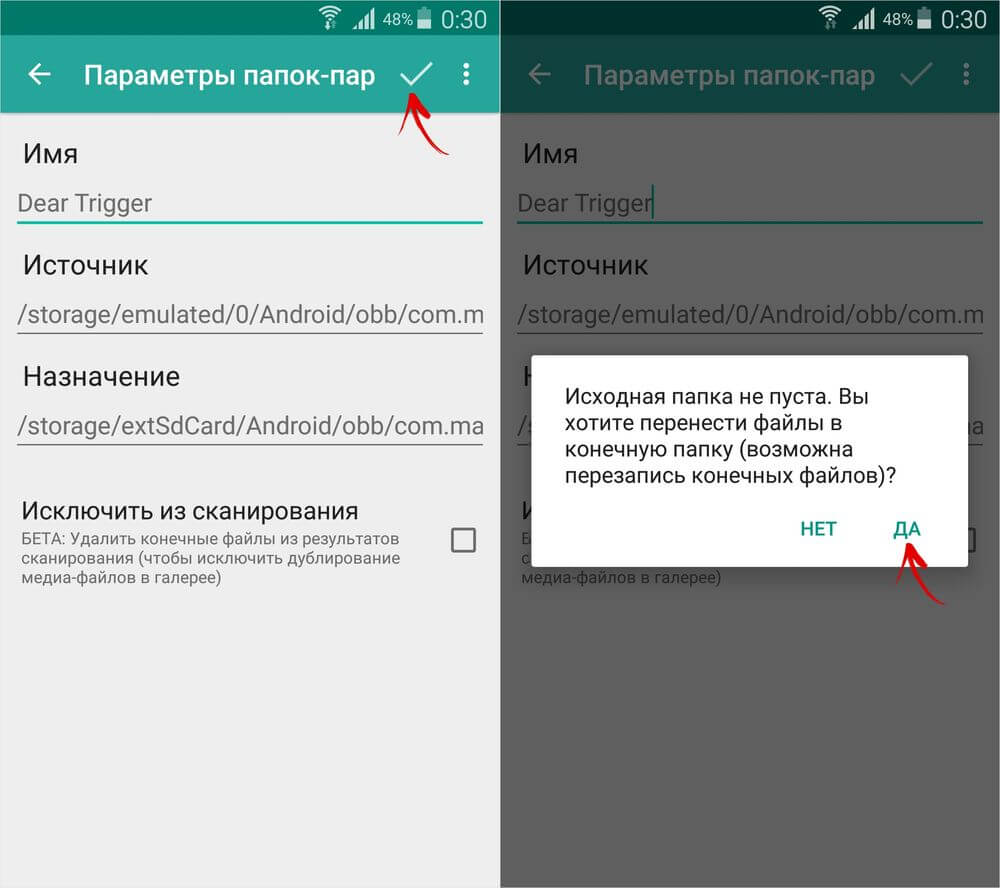
Click on the second one, after which the built-in file manager will open. The game cache is located in the “Android/obb” directory, and the application cache in “Android/data”. Go to the folder you want to mount and click on the checkmark.

The screen will ask if you want to create the destination folder automatically. Click "YES" if you agree. In this case, FolderMount will copy the path from the internal storage and create the same on the external drive. Click "NO" if you want to manually set the mount end point and select the folder where to move the files.

To start copying, click on the checkmark and confirm the transfer by selecting “YES” in the next window.
The process will be displayed in the notification panel.

Once copying is complete, switch the toggle switch in the “List of Pairs” tab to mount.

At the bottom there is a button with a pin image, clicking on which will mount all directories at once.

To move files back from the destination folder to the source folder, first unmount the pairs: to do this, turn off the toggle switch or click on the crossed out pin, then hold your finger on the pair and click on the trash can icon.
How to move apps using Link2SD
Link2SD is a program that can mount application data onto a memory card. In order for it to work, it is necessary to create an additional partition on the SD in the ext3/ext4 file system on the mobile device. Partitioning a memory card into sections is done in one of the following ways.
(!) Before creating a new partition, copy all the files located on the SD, as they will be deleted after partitioning the memory card.
Memory card partitioning on Android via TWRP
If installed on your smartphone, partition the SD card through it. To do this, click “Advanced”.

Select "Partition SD card".

Check "Micro SD card" and click "OK".
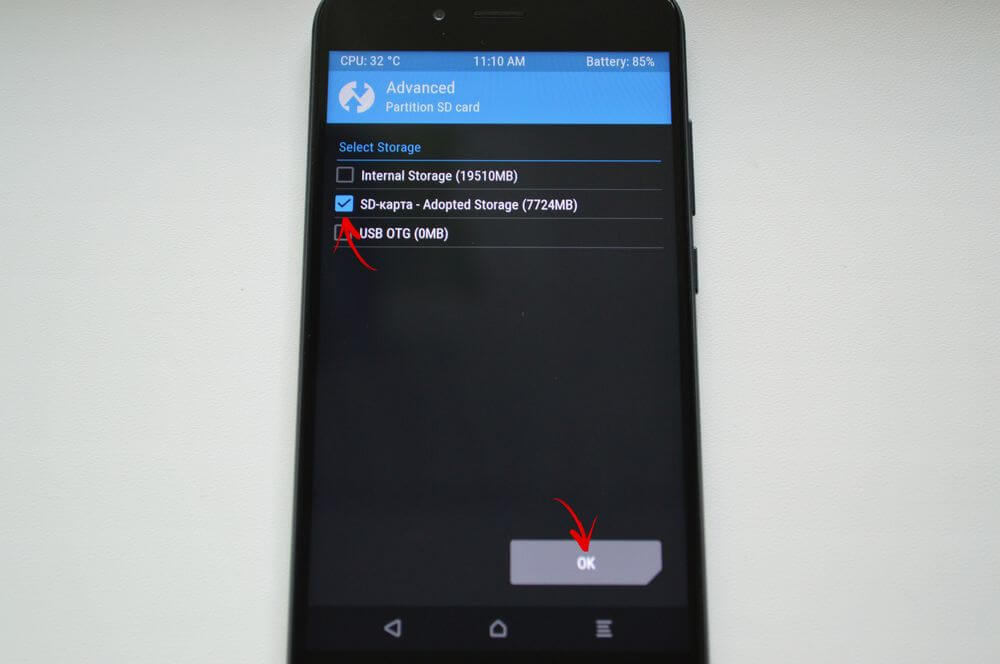
Select the file system of the ext-partition to be created and specify its size. For example, 2048 MB - this memory will become available for transferring applications and the volume of the SD card will be reduced by that amount. Leave the Swap partition size (paging file) equal to 0.
Drag the slider to begin SD marking.

At the end, click “Reboot System” and “Do Not Install” if you do not want to download the official TWRP application.
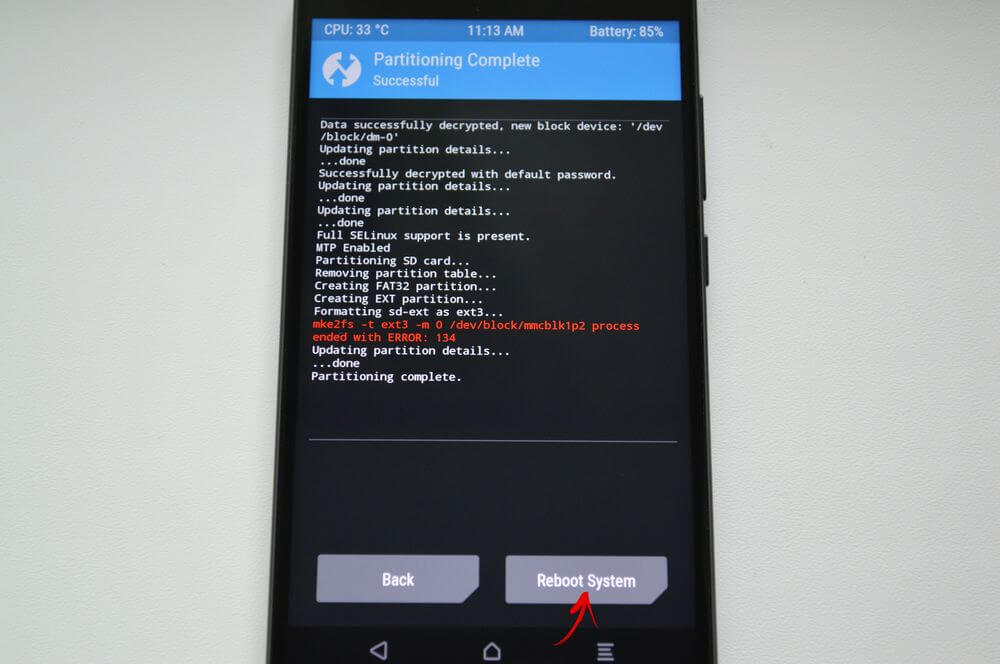

The device will reboot. If you go to “Settings” → “Memory” (or “Storage” in the latest versions of Android), you will see that the SD size has decreased. The second section “sees” only Link2SD, App 2 SD and similar applications.
Create a hidden partition on SD using AParted
The second way to split a memory card into 2 partitions if you have Superuser rights, but no TWRP:
Go to “Settings” → “Memory”, click “Disconnect memory card” and confirm the action.

Launch AParted and grant root access.

There are 2 bars in the Create tab: the top one will display the new partition, and the bottom one shows the current SD size and its file system.
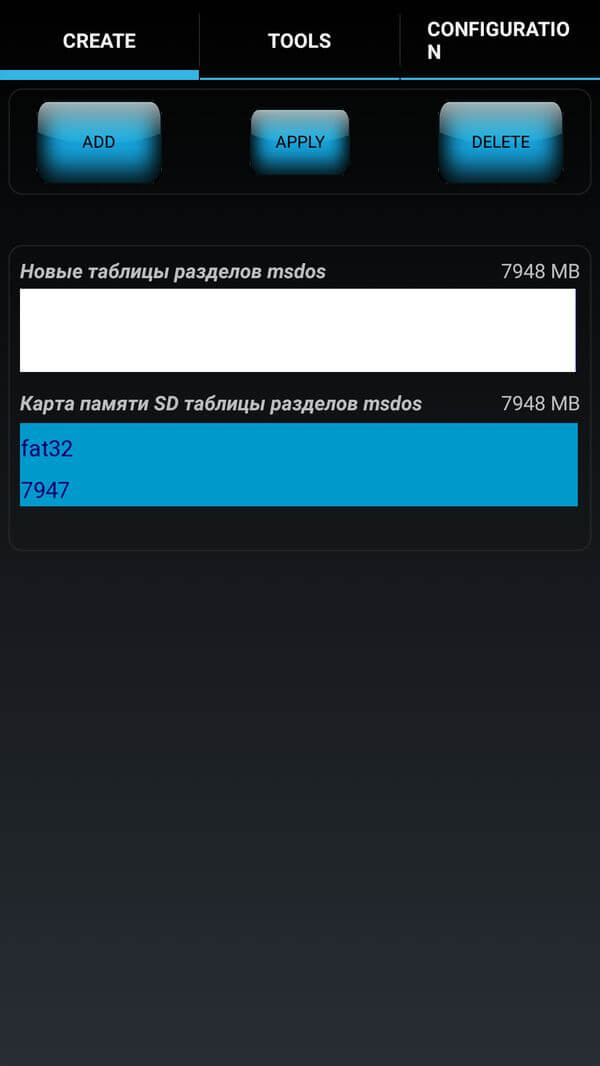
Click "ADD" to create the first partition. This will be the new size of the memory card where you can save photos, music, videos and other files. Leave the checkbox next to “Format”, the fat32 file system and select the size with the slider. To set it more precisely, click on the number next to MB, enter the desired value and click OK.


Click “ADD” again and create a second hidden partition to which games and applications will be transferred. Pull the slider all the way, leave “Format” checked and select the ext file system.

Click “APPLY” and select “OK” in the warning window that appears.

The SD partitioning process will start.

When completed, the second line will display 2 sections.

Now connect the memory card through “Settings” if this did not happen automatically. The new SD size should be displayed there.
Working with Link2SD
Open Link2SD and grant the program Superuser rights.

A window will immediately appear asking you to select the file system of the hidden partition of the SD card. Check the appropriate ext version and click OK. If the window does not appear, expand the menu on the left and click “Recreate mount script.”


Then click "Restart device" to mount the second partition of the memory card. The device will reboot.

Once Android is launched, go to Link2SD, click on the 3 dots in the top right corner and select "Multiple".

Select the applications you want and open the menu again. Click "Send".


There's also a "Move to SD Card" feature that moves apps using the standard Android method that isn't available to users without a Link2SD.

If you need to move one game or program, find it in the list, click on it and select “Send” or “Move to SD card”.


To move applications back, select them and click “Return” or “Move to Phone”. If you need to combine partitions, simply format the SD card in the “Settings” → “Memory” menu.
Probably, each of us has encountered the problem of insufficient memory or simply wanted to transfer applications to a flash drive, since the memory was already full, and games and applications cannot be transferred to MicroSD and the notification “Insufficient memory on the device, some functions may be limited” was annoying.
Even if I deleted many applications and games, there was still not enough memory. But how to increase memory without losing everything? Later in this article we will look at and find out how to solve this problem.
I want to warn you right away that neither I nor the site administration are responsible for your actions. You do everything at your own peril and risk.
P.S. The article uses the most simplified words for better understanding.
To continue you will need:
- MicroSD Card with at least class 6 (preferably class 10) and larger than 4 GB in size
- (To create a second partition)
- (For transferring applications and games)
- (For transferring games with cache)
To increase memory, we will have to transfer your applications to the so-called second partition of the MicroSD card (for transfer you need ), and we will create it ourselves. If you already have a second section on your map, you can skip this item.
Creating a second MicroSD partition
1. Save all files on another medium (For example, on a computer)2. Disconnect the MicroSD card along the path “Settings/Memory/Disable memory card”

3. If you have ROOT rights, install, if not -

4. After starting, click on “+” twice  5. Select “Ext4” in Part 2. If you have a device running Android 2.2-2.3, select “Ext 3”
 6. In Part 2, select the size, how much memory you want to allocate in MB from the card for applications and games (The more the better)
  7. Look at the first graph with a white bar, with the amount of memory remaining and enter these numbers in Part 1
 8. Check if you did everything correctly. If everything is correct, click on the menu button or the so-called “three dots in the corner”, and click on “Apply changes”
  The hardest part is over, you can reconnect the memory card (Settings/Memory/Connect memory card), transfer files back to the flash drive, but before that you can notice that the size of the memory card has decreased. This is how it should be, because we created the second section.
Setting up transfer to the second partition
We need to install the program (Google Play)
After installation, open the application. You should see a window like this. Select "Ext 4" or "Ext 3" for Android 2.2-2.3 and click on "OK".


After rebooting, open the application. You should see a list of applications.

Now we will look at what can be transferred and what is better not to transfer.
Let's just say that system applications should never be transferred. You never know what will happen. Therefore, it is better to transfer custom applications (those that you installed yourself). I do not recommend transferring those applications that you actively use (For example, Browser or WhatsApp and the like).
And to make it more convenient, the application has sorting. To do this, click on “Exact three stripes” and select “Custom”.


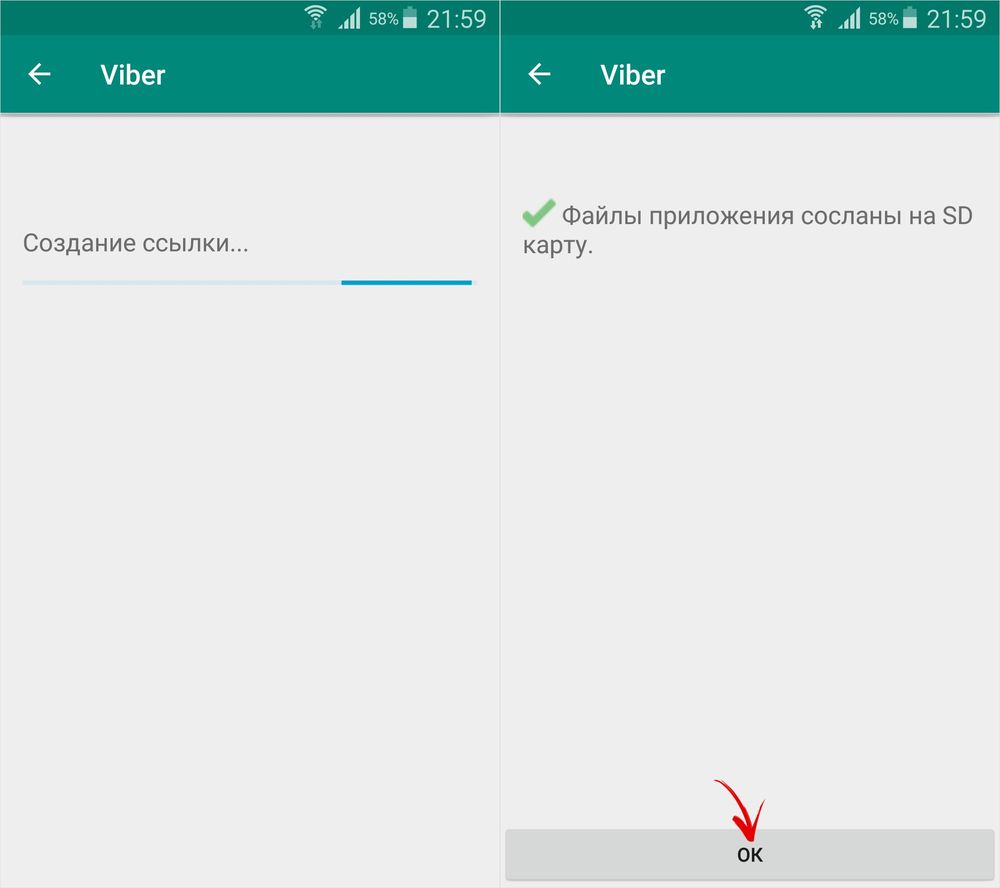
A list of your applications should appear in front of you. Now you can select the applications that you want to move to the second partition and link them there. Click on “Three Dots”, then on “Several”, select the applications to transfer and click on “Send”.


A few minutes of waiting and you're done! You have more memory, and you can still download games and applications and transfer them. If you delve into the Link2SD settings, you can enable auto-link. This is a function that automatically transfers the application to the second section of the card, thereby making your life easier.

You can also change themes in the settings, buy the Pro version, and so on. But that’s not about that now. In general, we figured out the main problem. But, I want to tell you, Link2SD does not transfer game cache (Game cache is files in .obb format along the path Android/obb/“game package name”). So what should we do? Let's talk further.
Transferring game cache and data to a MicroSD card
Game caches can be transferred using a great program called . I’ll say right away that the cache is transferred to the flash drive itself, and not to the second partition.
Open the application, and swipe from the left edge of the screen to the right edge (Swipe) and tap on “Application Analyzer”


Android OS users over time face a lack of internal space, which makes it difficult to download and receive files via Bluetooth, and makes it impossible to install new applications. The reason lies in games and programs for which 8 or 16 GB drives are not enough. The solution to problems is to move the application cache to an SD memory card using one of two available methods.
System cache move
The first and most accessible way for a novice user to transfer the cache to an SD card is a system move. Transfers part of the application, including massive files. To do this, go to the device settings, then “Programs”. A new window will display a list of all installed applications, go into the one that is taking up a lot of disk space and find the “Move to SD card” button. Clicking on it will automatically transfer the cache from the internal drive to the external one (if the memory is divided into 2 sections) or to a MicroSD card.
Similar actions are performed using third-party utilities, for example AppMgr III (App 2 SD). It does not require Root rights, but with them a couple of additional functions will open. The principle of operation is no different from the standard one, only batch actions are available here, the cache is transferred and cleared in one click, and moved applications are displayed.
At the same time, not all devices support system data transfer. In them, internal and external memory are one and the same, and access to the MicroSD card is blocked. But even if your smartphone or tablet does not lack such a function, some applications are not portable because the developer did not add it. In addition, after the transfer, some games will take longer to load due to a slow card. Therefore, make sure that the speed of the flash drive is at least class 6.
Mounting cache folders
The second way is to mount folders. Physically, the cache is stored on MicroSD, and the device’s memory contains only the images necessary for proper operation. At its core, these are like shortcuts in Windows; files are stored on one local drive, but accessed from another. Actions are performed using the FolderMount application (Root rights are required, otherwise the program will not work). The mounting process is simple and consists of several steps in which two folders are linked together.
- Open the application and click on the plus button.
- In the window that appears, fill in the information in three fields:
- “Name” – the name of the mounted folder (not necessarily exact).
- “Source” – the path to the folder whose data needs to be moved.
- “Destination” – the path to the folder on the MicroSD where the transferred data will be stored.
- We confirm the choice and agree with the warning about transferring files, wait for the operation to complete.
- Activate the mount by pressing the pin button. After this, the files in both folders are linked together.
Please note that file managers will report duplicate files in your linked folders. In fact, the information is contained only on the MicroSD, and the internal memory contains images. To delete an application whose cache was transferred to the memory card, first unmount the folder. To do this, click on the pin of the previously linked pair, then long press, after which the basket shortcut will appear. The data will be moved to the original directory and deleted.
The free version of FolderMount is limited compared to PRO, and offers 3 mount points. But even this is enough to free up space from the heaviest applications.
Was the article useful to you?
Rate it and support the project!